Building a Cold Frame from Salvaged Materials
I feel like April is the month homesteaders start to really get excited. It’s the time of year that Spring is finally starting to make a presence, and we start projects outdoors. Projects like building a cold frame.

I’ve said it before, and I’ll say it again – I do enjoy winter. I love the snow. I love the cozyness of staying indoors with lit candles, twinkling lights, hot coffee and tea, and lots of baking.
But, by the time March hits I am dreaming of gardening, and baby animals, and spending time in the outdoor sun. And this year was no exception.
I started my gardening seeds indoors, but I was beginning to wonder how I could get vegetables from my garden sooner, rather than later. I started thinking about how last year my friend gave me some lettuce quite early in the season and I questioned her on how she had lettuce already.
Turns out, she had a cold frame.
Now, what is a cold frame?
A cold frame is a box with a glass or plastic top that allows the sun to shine through. It allows more heat to be retained, which means you can grow things a little sooner or later in the season. While we usually wait until May long weekend to plant things where I live because that’s when the threat of frost has passed, the cold frame has allowed me to plant seeds in the first week of April.
Lettuce is the one thing that draws me to the grocery store more than I want to go. I enjoy fresh produce and lettuce doesn’t last very long. It feels like I am constantly replenishing my lettuce stash.
However, this year’s goal to make a cold frame was also driven by another issue going on. We are in the middle of a lockdown for the pandemic that is hitting across the world. We are entering week 5 and the grocery stores are struggling to keep things on the shelves. Frankly, I’m finding regular grocery trips quite stressful. I’ve been going as little as possible.
Needless to say, the push to grow my own food faster than usual is strong. More food on the homestead means less trips to the store.
So, my husband built me a cold frame. And today I want to share with you how to do that.
Now, a few notes about the following information. There’s no measurements or plans, per say. I’m writing this post with the idea that you have some basic carpentry skills, or, if you are like me and have NO carpentry skills, you have a husband who does and he’s going to be able to figure out all those kinds of details.
Aren’t husbands the greatest? 🙂
The other reason I’m not giving measurements is because when it comes to something like a cold frame, how big you want to make it will vary depending on the size of your yard or property, and how much you want to plant in it.
Also, I’m not even sure my husband measured anything. I mean, I’m sure he did. But I didn’t ask him. Which means I ain’t got no measurements. 😉
The 0ther thing I want to say about this project is that our goal was to use what we had on hand and not buy any materials to build it. So, you can get creative and use what you have. For example, we used plastic for the top, but many people use reclaimed old windows, which give a very beautiful look. We were fresh out of old windows, but had a massive roll of thick plastic, so that’s what we used. I may replace the top with a window if I come across one at some point, but for now, the plastic works just fine.
HOW TO MAKE A COLD FRAME FROM RECLAIMED MATERIALS
Okay, the first thing we did was rototill the section where we wanted to put the cold frame. We’re just sticking it in a corner of one of our gardens (we have a few different gardens. This one is where we will be planting our squash this year.)

The next thing we did (okay, let’s be honest, “we” is the royal “we”. I did nothing. My husband did it all) was make a box, or frame from some wood we had lying around. If you are lucky enough to have access to rot resistant wood your cold frame will last longer.
On the back of the frame he added an extra piece of wood to make it higher, and reinforced it with smaller pieces of wood. As you can see I’m really good at all the technical descriptions here. If any carpenters are reading my blog, let me just say, this is not the tutorial for you. I can see you shaking your head at me. I’m not even going to try and pretend I know what I’m talking about when it comes to building things. I’m just telling you what my husband did – in mom lingo. Come to think of it, I probably should have let him write this post….
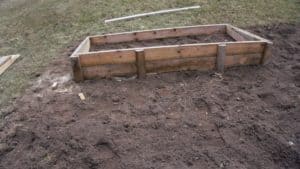

After the box was made, my husband cut two boards to make them slanted. The slanted wood on each side of the box will help the cold frame capture more sunlight. He also put a board covering the back to attach the top frame to. You can see the board in the next picture.
Next, he made a frame, once again from wood we had lying around.

He covered this frame with thick plastic we had. He used a staple gun for that.
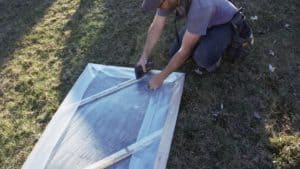
Then he attached the frame to the rest of the box with hinges.
We can use pieces of wood to prop up the frame if we want on the hotter days.

I then layered some more dirt into the box. I just took dirt from other areas of my garden that had extra soil to spare.
And that’s all there is to it! I mean, I make it sound easy but truth be told, if I tried to build this box it would be quite a mess. However, it seemed pretty easy for my husband, so I’m going with the thought that it isn’t that complicated to make.
I think it’s going to work really well for our needs here on the homestead. The only thing I could see being a possible problem is wishing we made it a little taller – but it really depends on how fast and high the greens grow. Once it’s warm enough we will have the lid open anyways, but if you think you will need more room at the top for your greens to grow, then just build your box up a little higher.We may build it up taller if we see that is a problem this year.

The other thing you can use cold frames for is hardening off your indoor seedlings before you transplant them to your garden.
I’m so excited to have lettuce earlier this year. I also planted some spinach and kale in the cold frame. I am already seeing things pop up so it’s clearly working. I look forward to stretching out the end of the season with this as well. Winters are long here in Canada so any way I can stretch the growing season, I want to be able to do it.
Now, if I could figure out how to make my garden self-weed for me….